Pick out a guilty pleasure from the grocery store and replicate it organically at home...
In light of my ongoing month of trash audits, I aspired to make my daughter's standard evening dessert, mochi.
These run $1.16 - $1.33/serving and generate a lot of cardboard recycling and a plastic film cover. They aren't organic and I don't love that they have palm oil and wish we had more control over the sugar level, "natural flavors," and things I imagine are stabilizers like guar gum.
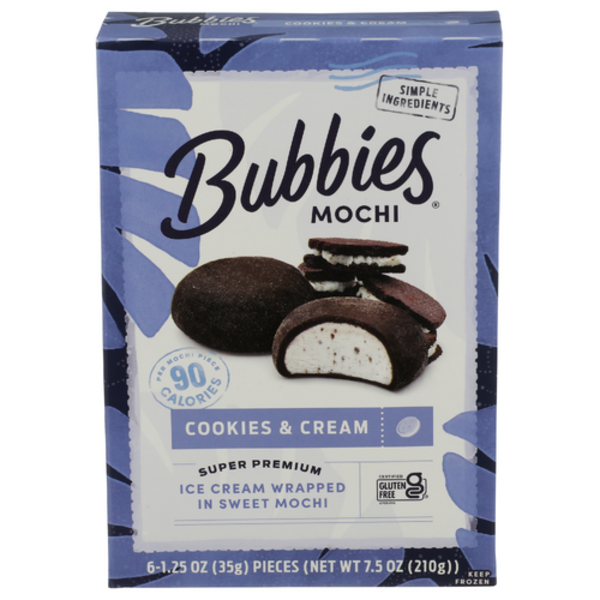
Since I am not the end consumer of this recipe, I compromised a little bit on the "from scratch" objective to see if I could first entice trying the new concoction. I used my daughter's favorite healthy-ish organic acai sorbet as the filler, a flavor that is not available in any mochi line. Yes, it has some stabilizers and a lot of sugar added, but I figured if I got the recipe dialed in that she preferred home-made, I could branch out to banana nice-cream, and other healthier home grown options. Also, a ball sized dollop of acai is substantially less (and less sugar) than her typical bowl-sized serving.
We still had a few materials from a gift mochi-making kit (silicon ball mold mat, mold cutter, and baggies of rice/potato starch), so I used these to assemble 8 mochi. I should have used a larger microwave-safe bowl than my little pyrex round 2 cup dish, the biggest challenge was overflow when I tried to stir it between blasts. I slid the 6 best-looking ones into an old mochi box. So far, she has finished one for dessert. In my own taste test, I concluded that the dough freezes a little more firm with my version and I need to level up a bit on making aesthetically attractive balls, but overall, this was a great start.
Verdict: I could easily see myself restocking the dough inputs to whip up some batches of these in the future to "dilute" the store-bought mochi habit. That said, this is a pretty fussy recipe for the yield and I plan to keep experimenting with other, easier prep dessert/dessert-adjacent dishes.


Mochi
approx .5 cups ice cream/acai
.75 cup sweet rice flour
.33 cup sugar
.75 cup water
.25 cup potato starch
Cocoa or matcha powder (optional color)
Press 10 min thawed ice cream into molds. Freeze 1-2 hours or overnight
Heatproof bowl sweet rice flour, sugar, optional color whisk then add water
Cover in plastic wrap, microwave 1 min, stir, 1 min, stir, 30 sec stir
Prep surface with potato starch
Roll out dough on surface, flip, add more starch as needed
Rolling pin to ⅛” thick, cut out 8 circles with dough (my yield was 9)
Plate with plastic wrap (will need to individually wrap balls)
Chill in fridge 30 mins (clean up)
Continue your unprocessed journey and replicate two more items organically.
#1: "Snickers" protein bars
This idea got fixed in my head after reading a MaryJane's Farm article about copycat Halloween candy recipes. I have generally trained myself not to routinely bring candy into the house and couldn't bring myself to make it from scratch, but I do have a guilty pleasure of reaching for a protein bar when things get hectic and they aren't that far off from being a candy bar. On my favorite protein powder website, I saw a bar recipe I just had to try. The other things I loved about this recipe is that I could try using Vitamix to make oat into flour and I loved that the authors included the weight of sticky things in grams because I hate to mess up all my measuring cups and would rather spatula messy things directly into the mixture bowl that is sitting on a kitchen scale.
Again, the perfectionist in me wants to caveat that this isn't perfectly organic and it uses artificial sweeteners (stevia, thaumatin). Plus when I divide the 25 g of protein powder across 12 servings, each one only has about 1.5 grams of protein from the powder another 8 g from peanuts, PB and oats. So this is basically a candy bar which happens to have 10 grams of protein. A comparable snickers looks like it would have about 1/3 that amount of protein. Snickers also makes a 20 g "hi" protein bar, but there is no way those are easy to find on impulse in a convenience store. Likewise, it isn't a perfect copycat to the format of bars you can throw into the glove box and forget about for months until you have a food emergency.
Verdict: Tasty! The chocolate coating was overly fussy and I can't see myself taking the time if I didn't already have the bain-marie going for a batch of chocolate covered bananas, berries, etc. That said, I think I will keep experimenting with recipes (like this one) that call for a higher proportion of protein powder to see if I can find a mix that boosts the satiation power of "dessert."

Ingredients
For the Base:
100g/3½oz/1 cup oats
70g/2½oz/½ cup roasted peanuts
25g/¼ cup Form Chocolate Peanut Protein
Pinch of salt
60g/2oz/¼ cup smooth peanut butter (NB: I substituted slightly chunky chocolate-hazelnut copycat Nutella I was trying to use up)
2 tbsp maple syrup
1 tbsp coconut oil, melted
1 tbsp plant-based milk
For the Middle:
80g/3oz/½ cup medjool dates, pitted weight
60ml/2oz/¼ cup plant-based milk (NB: I substituted cow milk because this didn't need to be vegan)
80g/2¾oz/1/3 cup smooth peanut butter
2 tbsp coconut oil, melted
1 tsp vanilla essence
Pinch of salt
70g/2½oz/½ cup roasted peanuts
For the Chocolate Coating:
112g/4oz dark chocolate, chopped or in chips
1 tsp coconut oil (NB: I used cocoa butter chips to thin because this coconut oil was the messiest ingredient (this time of year it is in solid form)).
Extra peanuts (NB: I skipped this)
Flaky salt
Instructions
1. Line a 15-cm/6-inch square baking pan with baking parchment. Soak the dates for the filling in boiling water for 10 minutes and then drain them. (NB: I used a pyrex loaf pan which was slightly more surface area)
2. First, make the base: add the oats and peanuts to a small blender and blitz to a fine flour-like texture. Add this into a small mixing bowl with the protein powder, peanut butter, maple syrup, melted coconut oil and plant-based milk. Stir to a sticky mixture that holds together when pressed between two fingers.
3. Pour all of the base mixture into the pan and press down firmly to make a compact layer. Chill in the fridge while you continue.
4. To make the caramel: add the soaked and drained dates, plant-based milk, peanut butter, coconut oil, vanilla essence and salt to the blender and process until really smooth. Stop to scrape down the sides as necessary.
5. Remove the baking pan from the fridge and spread the caramel all over the base. Sprinkle over the peanuts and press down lightly. Return the pan to the fridge (or freezer) for 2 hours, or until firm to touch. (NB: I put in fridge but in the future would favor the freezer to make the dipping step easier)
6. For the chocolate coating: melt together the chocolate and coconut oil in a heat-proof bowl over a pan of simmering water (known as a bain-marie) or in the microwave, until glossy. (NB: I felt I needed slightly more chocolate than this to cover my bars, possibly because I had 12 vs 10)
7. When ready to coat, lift the bars out of the tin and use a sharp, warmed knife to slice the snickers bars into 10 pieces. Now, dip each one into the melted chocolate, face down, to coat the peanut and caramel middle. Allow the excess to drip off and transfer to a plate.
8. While the chocolate is still warm, sprinkle over some crushed peanuts and flaky salt, if desired. Allow to set in the fridge for 10 minutes.
9. Enjoy straight away or keep these bars in a sealed container in the fridge for up to 1 week, or in the freezer for 1 month. Allow them to defrost before eating.
#2: Pop-can Flaky Biscuits
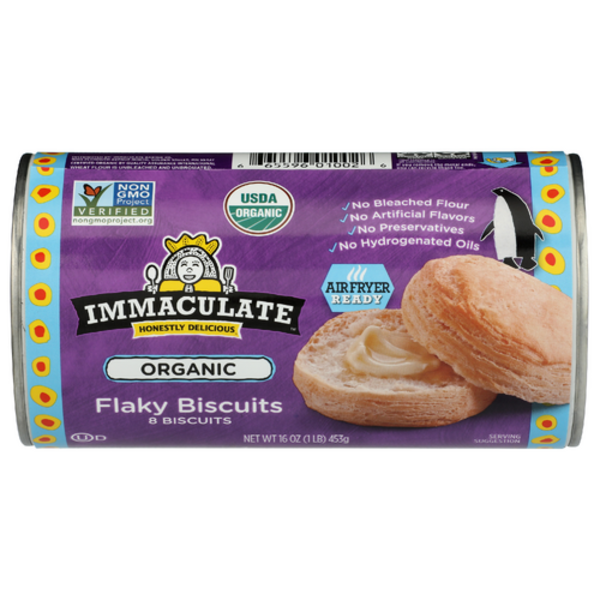
Like mochi, these bookend my daughter's day as her breakfast of choice. They are technically organic, but I don't love that each one costs $0.93, they generate 45 grams of packaging trash, and contain palm oil. My first attempt to DIY was to use a Mary Jane's Farm buttermilk biscuit mix. These were an improvement in only generating 18 g of trash and not using palm oil. I also loved that this got me started using my skillet/dutch oven on the stovetop for baking projects. I had been spooked by the MJF bakeover recipes which called for putting the skillets in an actual oven because my little micorwave/convection cannot fit large pans like that. However, this will not be my final destination for copycat pop can biscuits. These turned out tasty and stick-to-your-ribs savory, but were less of a laminated flaky pastry that is easy to break open and smother in chocolate hazelnut spread. They also work out to be more expensive to source from Idaho. That said, this was so educational, I am glad I gave it a try and believe I can track down the recipes to make similar bakeover mixes in Mary Jane's cookbook but using responsibly harvested ingredients that are sourced closer to home.

No comments:
Post a Comment