Sunday, November 28, 2021

#19 Create a Fairy Garden (in progress)


So I could technically call this done, but it doesn't "feel" done, it feels like I dipped my toes in with an easy-to-do project when my real ambition was to swim to the other side of the lake.  

Prototype 1:  My Fairy Garden Playset bday gift for kid.  It was something crazy like $12.  Now between Black Friday and Cyber Monday it is listed at $38.  This got some modifications-- hubby drilled holes in the moat for drainage and I topped it up with potting soil since the peat cubes were not enough.  I then reseeded it with Botanical Interests Fairy Meadow flower mix that was a prior gift to me from MIL.  They seem to be doing OK, but need vigilant watering because the moat is so shallow it dries out very quickly.  The solar panel is still turning the windmill a month and a half after kiddo's bday.  

This plastic confection isn't exactly what I had in mind for fairy gardening.  I'm more into the delightfully miniaturized ephemera of daily living strewn in surprising places around the garden to encourage more puttering out there.  

Other ideas:  polymer clay dough gnomes.  Maybe one that looks deceptively strawberry-like to hide where they grow.  Maybe one that looks like Ron Finley, gangsta gardener.  We sat in on an airbnb experience he hosted pre-2020 and were amazed at his lunker sweet potatoes growing on the median.  Ollas keep those going?  Really?  I also binge watched his Masterclass last week while super under the weather from a covid booster and difficulty sleeping.  While I'm making a Ron minifig, why not some "homie gnomies" with LPS (local gang but also very close to a Finleyism of Let's Plant Shit).  To be continued!  


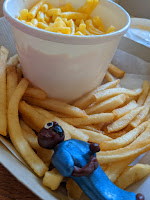
1/14/22:  So I've made a Ron Finley gnome that is more super glue than clay.  Giving him a ball head and tiny arms with no reinforcement meant things snapped too easily.  He hung out in the peas by a divided aloe for a while until my kid took him to a food dessert (her Ruby's mac n cheese + fries to go box). 


2/7/22: I made a Jesse Krebs.  She is stubbier and even said she was "OK looking like a lump in the field" if that meant she wore roomier men's clothes she could stuff with insulation.  I reinforced her neck area with blonde hair and a hat, kind of like those gnomes with beards and you only see their noses.  I ran a needle and cordage through her hat.  She has a weird habit of rocking back on her base and ending up in a supine position, but that was one of her big points in her survival class anyway-- chill out, don't burn energy panicking.  Going to call that a bug not a feature.  

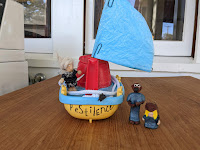
2/13/22:  Inspiration for this was sparked by seeing a bee struggling to get out of our blue barrels of rainwater and wanting some sort of gnomish raft.  Then I remembered the Moxie Marlinspike Hold Fast documentary about the anarchist yacht club and spent a date night rewatching that with rapid-to-buy-a-boat hubby.  

This one was surprisingly easy to pull together.  The ethic of borrowing/stealing little-used equipment and muddling through diy without the help of expensive ordained Experts put some wind in my metaphorical sails.  The derelict plastic boat happened to have been abandoned on our shower floor.  It hadn't moved positions for several days, so I don't think DD will much miss it.  Like the real boat, it had routinely had a mildew problem and taking it apart to spray its hull with bleach so that my soul would hurt less watching DD sip bath water from its spout.  I didn't borrow someone's dinghy crane to get the aluminum sail (a metal straw issued by DH's company to celebrate their Zoom-hosted pandemic Tikki holiday party).  But I did need a demo from him on how to seat a drill bit in a drill and then find a girthier bit in the depths of the shed.  The sail itself was a parachute for a cheap Valentine's day toy DD had quickly tangled into a hopeless knot and lost interest in.  I tried to staple a little black anarchy flag in there for good measure as well.  Moxie himself I fashioned out of 2 unraveled paper clips, after learning nothing happens to baked needles and thread with the Jesse gnome.  He has a pretty ectomorphic build that seemed to work well with a metal skeleton.  I put him in a pink bikini as per the documentary.  I stuck a leftover bit of paper clip in his hand so he has the option to string a fishing line off it or club whatever dorado he happens to catch senseless.  After baking, I glued on dog fur I had rolled into dreads and a scrap of worn ragged black shirt of my husband's.  Pony tail elastic for belt and an old swim short shoelace waistband to keep him from tipping off the boat (I had also discovered with Jesse that polymer gnomes generally sink).  I'd like to eventually pair him with Anne Bonny and Mary Read after a Neil Gaiman masterclass segment read his March Story and piqued my interest in female Caribbean pirates and because the Pestilence crew kinda had a similar lesbos feel to it without outright discussing the interpersonal dynamics of its members.     


#3 Chocolate Scented Garden [In progress]


**This went in the Dec '21/Jan'22 Master Gardener internal newsletter**


Like Water for Chocolate


“Mommy can’t help with ice cream because… she’s growing wider and wider?”  quipped my three-year-old, a spoon laden with its precious cargo of Baskin Robbins making another precarious transit to the lower half of her face.  True, my metabolism is not aging gracefully, but with age, I’ve developed a deeper appreciation for my sense of smell.  Perhaps I can take the edge off my sweet tooth by surrounding myself with more chocolate-scented plants?    

Oncidium- Sharry Baby.  Shipped from an eBay seller twenty miles north.  Collectors suggest newbies buy orchids “in spike” for the more immediate gratification.  Perhaps the general reputation of orchids and its price ($52!) drove me to be more attentive to it.  Two and a half months in, my spike bloomed into a delicious floral chocolate-vanilla cascade that wafts across my southern-facing desk as the sun warms it in the morning.  If I squint my nostrils, I could convince myself this cuppa joe is actually mocha… but I find that I prefer the complexity of the orchid’s own notes to a flat more decidedly chocolate bottom-of-the-trick-or-treat-bucket smell and I like that it persists even after I have drained my cup. 

Akebia quinata and Akebia quinata Shirobana.  Encouraged by my orchid success, I bought purple and the more exotic white flowering chocolate vines from further afield in Georgia off Etsy a few weeks later.  Their princely sum of $67 seemed unwarranted for their “invasive” status in several midwestern states.  While they have survived their first repot, most sources list Akebia as hardy up to zone 8 or 9 and Santa Ana is a few clicks higher.  Akebia would flower in May through June, so perhaps it will still be a manageable size to stand in as a fragrant houseplant and “overwinter” the summer indoors despite its reputation for rampant growth.    Sources say the pods and their pulp are edible and akebia fruit is recognized in northern Japan as a sign of autumn.

Berlandiera lyrata.  Chocolate Daisy is coming full circle for me.  Two years ago, Gary’s approbation of the convincing and pervasive scent of these in his newsletter sent me to Laguna Hills to smell for myself.  However, just as the buds were on the verge of blooming, my daughter used her newfound mobility to drunkenly stumble over to its pot and, with an attention to detail I wish she would apply to Lego cleanup, removed every bud from the plant before my questions could be answered.  This time I sprung for a seed packet from Baker Creek in hopes of avoiding repeat trips to the nursery, my sticky-fingered daughter’s favorite place to shop.  


Image: Oncidium Sharry Baby orchid, Akebia quinata Shirobana white chocolate vine, Berlandiera lyrata chocolate daisy seedlings, and a Homo sapiens var F.K.F.  (self-watering).  


**12/5/2021** Sharry Baby second pseudobulb has made a spike!  I have moved the whole thing onto the dryer as I worried that a couple unseasonably hot days in the window might have scorched brown spots onto the leaves.  Or perhaps I was overwatering it?  

2/7/22: new spike started blooming.  It took a few days for scent to develop and is most pronounced in the morning, so it was touch and go with me wondering if I had covid.  I wouldn't say the orchid leaves look super happy-- more spotting and yellowing, but I dunk it in a kelp and fertilizer bucket in mornings and continue topping it up with orbeez when the levels look low.  The side of the container is so algal, it is hard to monitor the roots.  

In other news, the tips of the Akebia look blackened on both plants and the leaves themselves look coated with salt, but I do see some bud swell on both plants, so fingers crossed that was just the cost of transplant shock.  Berlandiera lyrata has been transplanted, so 3-4 seedlings into what was formerly a blueberry clay pot against the south wall of the house.  These look ok with handwatering, but if they are growing, it must be root structure.  I haven't seen any big takeoff in size since the transplant a few weeks ago.  

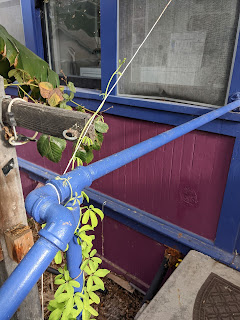
8/7/22:  I've moved Berlandiera away from the house wall when the blueberry sprinkler failed and under the mister table.  Now it is flowering a bunch, but it is too remote to enjoy its smell.  Akebia has had a couple growth spurts now that their pots are sitting on the back steps and starting to twine up the pipe railing.  


9/12/22:  Berlandiera had a couple months of gang busters growth under the mister table but the heat wave has killed it.  The internet says it is a perennial, so I will hold off renovating the pot and hope it comes back.  The Akebia have taken up position under the shade of the back door banana tree on the steps and have wound their way around the railing in a pretty pleasing way.  Should I run a string to train them to go overhead?  They seemed to do better when I got in the habit of watering them in the same rotation as the indoor orchids.  Chocolate orchids are not in spike.  


10/16/2022-- sharry baby orchid has sent up a spike!  Also learned about other chocolate scented plants (black salsify, Carolina allspice, chocolate cosmos, and chocolate mint)

11/18/2022-- sharry spike is finally open and fragrant!  I tried to enjoy it on the back porch desk but the sun is so intense there that the leaves started showing signs of burning after just a day or two.  So now I've got it in the kitchen, deterring me from starting any very pungent cooking projects... 

11/30/2022 started 6 black magic cosmos (the whole seed packet) in the germination station in hopes of diversifying the chocolatey plant varieties (see: lettuce for days post which has become more of a log of my plate germination station).  I've been using the chocolate mint in my pour over and it is pretty good. 

Saturday, November 27, 2021

#20 Take an REI Orienteering Course

Took a course in map and compass navigation from Peter Tay Tay at Crystal Cove.  This coincided with DH taking FIL scuba diving at the same place, so +$15 parking for me.  Here were my notes:


Positioning self to find/follow trail:
1.  LOT:  line of travel.  Use a straight side edge of the compass to trace the direction from your current spot to desired spot (i.e. parking lot to trailhead, curve of a section of the trail to rule out unmarked paths)
2.  DOT:  direction of travel.  Make sure the red arrow on the compass is pointed the direction you want to go so you don't end up going the exact opposite direction.
3.  CAN:  compass arrow N.  Set the hard-coded "N" on the compass to match the N on your map.  
4.  MAP: meridian points parallel.  Get the 4 gridlines in the face of the compass to match the lines on the map (magnetic north is about 11 degrees east of true north where we are in SoCal right now, so you'd use a tool that comes with your compass to adjust your meridian points accordingly).  

Once you've got that setup, you keep the "red in the shed" or the compass needle lined up with its red outline and you're traveling in the correct direction.  Helps to find landmarks to walk toward rather than missing all the scenery because you're so focused on the compass.  The closer together these are, the better you can course correct and not go too far astray.  Helps to have a partner you can guide if your straight line path goes through areas you have to go around.  

Taking a bearing to triangulate position: 
1.  BET:  Bearing extract from terrain.  Basically get to high ground, find a landmark (technically 2, but if you're sure you're on a trail listed in your map, you can use that as 1 point).  Point the red arrow of your compass at the landmark and spin the face so that red is in the shed.  
2.  CAN: compass arrow N.  Put compass on map and get it pointed in the direction of the map legend north. 
3.  MAP: meridian points parallel.  Get the 4 gridlines in the face of the compass to match the lines on the map.  
4.  COF: compass on the feature.  Get the edge of the compass lined up with the feature without messing up #2 and #3.  trace a line from the feature out in the direction you are standing.  Where it crosses the trail is how far along that trail you are.  Or if you took 2 bearings from landmarks, where they intersect is where you're standing.  

To pull this off, you need to get to high ground to be able to see landmarks.  

Taking bearings takes a lot of practice.  Figure out which eye is your dominant one (you can frame something with your hands and close one eye, then the other.  The one that doesn't move the image as much is your main eye).  I think my main eye is my left.  You should probably take a couple reads to be sure you've got it.  It is really easy to move or tilt the compass while you're trying to spin the bearing to get red into the shed so that it is no longer exactly pointing at your landmark.  Things far away are less precise for readings, favor closer landmarks like a trail fork or switchback in a trail you can see in a valley down below you.  In a real pinch, you could use the summit or V between two peaks.  Take a read off one end of a water feature or another, not the center which is iffy.      

A sighting compass helps you also avoid doing things like yawing by giving you a guideline to keep perfectly centered as you're taking a read.  The mirror can also work as a signal or help you admire yourself after a few days in backcountry.  I liked these more but apparently it is 50-50 on preferences. The one I used was a Silva Ranger for the northern hemisphere.  Compasses that work in both hemispheres are more expensive.  

You can use time and shadow to triangulate by putting a stick in the ground and using a rock to mark where its shadow lands.  The sun moves East to West so the shadows it throws move West to East.  Rock #1 is your west rock.  Time passes and rock #2 is your east rock.  You can figure out North from that.  

When reading topo's, ridges looks like gravy sliding out down the hill.  Valleys look like V's pointing up the hill.  If in doubt, water features are running downhill into valleys.  

When picking maps, favor ones with a scale that makes sense for what you're doing...  i.e. backpackers want scale 1:40,000 ft (I think?) or less to be able to see all the little details they are encountering, not 1 map that shows the entire 50 mile trail loop.  

You can use the strings on the end of the compass to calibrate to the scale on the legend so you know 1 string length is 1 mile or half mile or whatever.